Getting Started with STR711-SK Development Board and IAR Embedded Workbench
If you're looking for a powerful and flexible development board for your next embedded system project, the STR711-SK by STMicroelectronics might be just what you need. Designed for ARM7-based microcontroller applications, this board offers plenty of connectivity options, a range of peripherals, and a well-documented software ecosystem.
To make the most of the STR711-SK, you'll need a robust development environment that can provide reliable code generation, debugging, and testing tools. One popular choice for ARM-based microcontrollers is the IAR Embedded Workbench by IAR Systems, which is available in a variety of editions and licenses. In this article, we'll show you how to get started with using the STR711-SK and IAR Embedded Workbench to build your next embedded system.
Overview of STR711-SK Development Board
The STR711-SK is a compact and versatile development board that incorporates the STR711FR2T6 microcontroller. This microcontroller has a 32-bit ARM7TDMI-S CPU core, with a maximum clock speed of 60 MHz, 256 KB of flash memory, 64 KB of RAM, and numerous on-chip peripherals, such as UARTs, I2C, SPI, ADC, PWM, and timers. In addition, the board includes several external interfaces, such as USB, Ethernet, UART, JTAG, and I2S, as well as a 128x64 pixels OLED display and a few user buttons.
To get started with the STR711-SK, you'll need to power it up using a 5V DC supply (either via USB or external source) and connect it to your computer using a USB cable. You can then install the USB drivers and the flash programming software (ST Flash Loader Demonstrator) from the STMicroelectronics website. This software is necessary to load your compiled code into the flash memory of the microcontroller. You can also download the datasheet, the user manual, and the schematics of the board from the same website.
Introduction to IAR Embedded Workbench
The IAR Embedded Workbench is a comprehensive toolchain that includes an IDE, a compiler, a linker, a debugger, and a simulator. It supports a wide range of ARM microcontrollers and architectures, including the ARMv7-M, ARMv6-M, and ARMv4-T cores. You can download a trial version of the IAR Embedded Workbench from the IAR Systems website, which is valid for 30 days and offers full functionality of the toolchain.
Once you've installed IAR Embedded Workbench, you can create a new project for the STR711-SK by selecting the appropriate device and the board settings from the project wizard. You can then specify the source files, the header files, the compiler options, and the linker options for your project, as well as any debugging or testing configuration. IAR Embedded Workbench supports multiple debugging interfaces, such as JTAG, SWD, and ETM, and provides a wealth of debugging features, such as source-level and assembly-level debugging, hardware breakpoints, watchpoints, and code coverage analysis.
Implementing a Simple Example Program
To demonstrate how to use the STR711-SK and IAR Embedded Workbench, we'll implement a simple example program that toggles the onboard LED D2 at a frequency of 1 Hz. To do this, we'll need to write some C code that initializes the GPIO pin of LED D2, starts a timer interrupt, and toggles the LED in the interrupt service routine. Here's the code:
include "STR711_SK.h"include "intrinsics.h"void init_gpio() { // Configure pin 48 (LED D2) as output PA_DDR |= (1<<0); PA_CR1 |= (1<<0); PA_CR2 &= ~(1<<0); // Turn off LED D2 PA_ODR &= ~(1<<0);}void init_timer() { // Configure timer 2 as interrupt source TIM2_IER |= (1<<0); // enable update interrupt TIM2_PSCR = 5; // prescaler = 32 TIM2_ARRH = 0x01; // auto-reload value = 5000 TIM2_ARRL = 0x3C; TIM2_CR1 |= (1<<0); // enable timer}pragma vector = TIM2_OVR_UIF_vector__interrupt void TIM2_OVR_UIF_Handler() { // Toggle LED D2 PA_ODR ^= (1<<0);}int main() { init_gpio(); init_timer(); __enable_interrupt(); while (1) {}}
This code initializes the LED D2 pin as output and turns off the LED at startup. It then configures timer 2 to generate an interrupt every 5000 clock ticks (i.e., 1 Hz) and enables the interrupt request. Finally, it enters an infinite loop, waiting for interrupts to occur.
To compile and debug this code using IAR Embedded Workbench, we can create a new project, add the source files, and configure the compiler and linker options. We can then build the project and generate the executable code, which should be saved in a binary file (e.g., .hex) format. We can then use the ST Flash Loader Demonstrator to program the microcontroller flash memory with this code. Once this is done, we can connect the USB cable to the board and start the debugger in IAR Embedded Workbench. We can then launch the program and enter the debugging mode, which will let us step through the code, inspect the variables, and view the registers in real-time.
Conclusion
In this article, we've shown you how to get started with using the STR711-SK development board and the IAR Embedded Workbench. We've covered the basics of the hardware and software components, and demonstrated how to implement a simple example program using C code. We hope this tutorial has provided you with a solid foundation for exploring the many possibilities of the STR711-SK and IAR Embedded Workbench, and that you'll continue to experiment with this powerful platform.
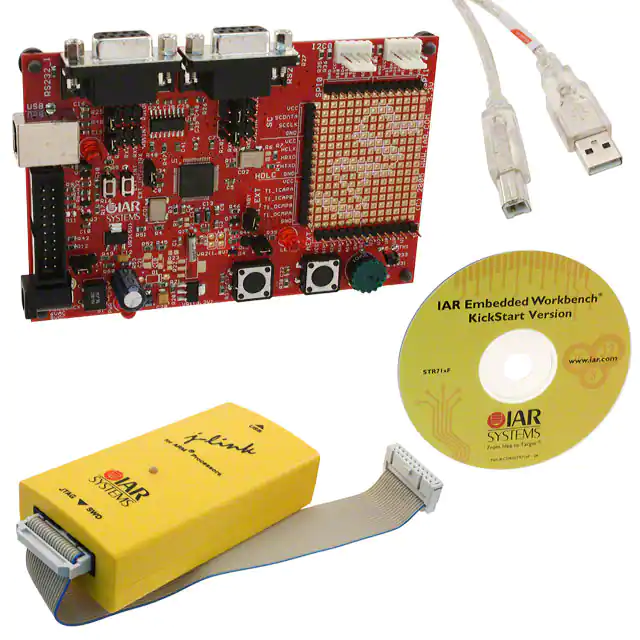
STR711-SK/IAR
- Part Number :
- STR711-SK/IAR
- Manufacturer :
- STMicroelectronics
- Description :
- IAR KICKSTART STR711F EVAL BRD
- Datasheet :
-
 STR711-SK/IAR.pdf
- Unit Price :
- Request a Quote
- In Stock :
- 2780
- Lead Time :
- To be Confirmed
- Quick Inquiry :
- - + Add To Cart
Request a Quote
STR711-SK/IAR Specifications
STR711-SK/IAR Guarantees

-
Service Guarantees
We guarantee 100% customer satisfaction.
Our experienced sales team and tech support team back our services to satisfy all our customers.

-
Quality Guarantees
We provide 90 days warranty.
If the items you received were not in perfect quality, we would be responsible for your refund or replacement, but the items must be returned in their original condition.
Certified Quality
 View the Certificates

